As a photographer who works with film,
I often get inquiries on various social media as to how the images
are done. This is especially true of my long exposure images. The
most common questions have to do with exposure, equipment used, and
how do I get those stars to be pinpoints if the exposures are an hour
or more. This blog post is my answer and I will link those that ask to it.
Astrophotography used to be the domain
of amateur astronomers; astronomers did astrophotography. With the
advent of the digital workflow, photographers have entered the
domain, at least with what can now be done with a fixed tripod and
camera arrangement. Professionals especially are well suited to
produce excellent results with digital cameras. They have the
resources at hand and workflow experience in post processing to best
the work of what the astrophotographers of old used to struggle to
accomplish with film.
Enter film based astrophotography.
This is how it was done just fifteen to twenty years ago. There was
really only one way to capture Milky Way vistas - with film.
 |
| The Sagittarius Milky Way Pentax 67 with 400mm SMC Takumar - Superia 100 |
One dispute over many professionals is
experience. They are not astronomers, but many are bright enough to
pick up on the basics of how the sky works. Some are truly gifted
sky enthusiasts and as such produce superior work.
Personally, I do not recommend those
just starting out with their interest in capturing the night sky
photographically to use film. Digital is faster, easier, and
encourages beginners to continue their efforts. Film based work can
be unforgiving. I've tutored a few individuals who attempted it and
were discouraged right from the beginning. There is so much that can
go wrong.
So why film? I use film simply because
it is what I have always used since I learned the craft in the early
1980's. In 2007, instead of switching to digital, I stepped up to
medium format film. In 2016 I am still using film, although I have
done some digital work. My other reasons for using film are
aesthetics, continuity with traditions started by early
astrophotographers such as E.E. Barnard, Max Wolf, and more recently,
David Malin, to name but a few.
 |
| The nigh sky view from the observatory Successive images overlapped to show fields captured with 400mm Takumar |
For me this is an avocation and I can
please myself with what I do, such as there still people who paint or
sketch. When I perform my best work, I get great remarks but they
are often mystified by my use of film despite my doing well with it.
This seems to be the default nature of modern photographers. It
prompts the question as to why? This also presupposes that there is
no advantage to film, only disadvantages. But this simply is not
true.
 |
| The Milky Way of Taurus and Perseus Bright and dark nebulae populate this wintertime target Pentax 67 105mm f/2.4 @ F/4 Kodak E200 - 1 Hour Exposure |
Film images exist. I can show them to
you. They are not virtual images or a representation of a kind.
Original images exist in tangible form. They are imperfect, and they
are vulnerable to the years following development. Done properly, noise is never an issue in long exposure work with film. Color films such as Kodak E200 deliver high fidelity red sensitive portraiture of the night skies. Most digital cameras, DSLR's namely, need to be modified for extended red sensitivity. Finally, rendition. The look of film is unique.
Workflow
The crux of this essay is to convey just how it's done. Analog astrophotography requires patience, years of practice, and perseverance before anything else. Good cameras, the proper films, and a way to share them in online communities are also required. The act of the image taking process itself is a sort of art.
The basics:
Access to dark skies away from city
lights, good weather, and no Moon dictates where and when to do the
exposures.
A properly aligned equatorial mount
with provisions to compensate for the Earth's rotation is also a
requirement. This may be the hardest part for many. I use a
permanently mounted fork mounted telescope permanently aligned with
the celestial pole. The celestial pole is the point in the sky where
the Earth's axis point towards. Aligning the polar axis to this
point allows the equatorial mount to work in parallel with the
Earth's own polar axis. Alignment to within a few arc-seconds will
allow extended tracking without trailing of star images during the
exposure.
 |
| Heavy lifter! Pentax 67 and 400mm SMC Takumar Riding Piggyback an 8" SC Telescope |
A second part of this tracking mount is
the clock drive. It's job is to rotate the polar axis counter to the
Earth's rotation. It also needs to be accurate. Being a mechanical
worm gear with a period of rotation of its own brings forth periodic
error. No gear is perfect compared to the precision of the Earth's
rotation, so we also need to correct this as time goes by. To do
this we incorporate a drive corrector. The drive corrector allows
the photographer to monitor a guide star as a reference to the
Earth's rotation and manually correct via a small hand controller to
speed up or slow down the clock drive when appropriate. This is
called guiding.
 |
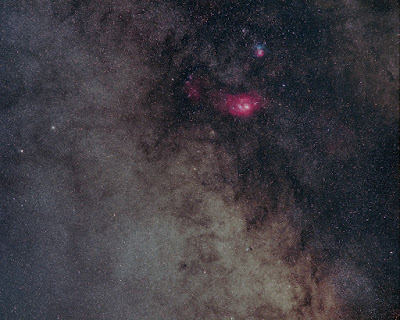
| The Small Sagittarius Star Cloud -Messier 24 Region Pentax 67 400mm SMC Takumar @ f/5.6 Fuji Acros 100 1 hour Exposure |
One can employ a small CCD camera in place of the guiding eyepiece to
monitor the guide star and do the corrections automatically. This is
called an auto-guider. It does the labor of constantly correcting
the drive as needed. I do not use one, as I monitor the guide star
(through the telescope the cameras are attached to) and correct
manually. This is tedious work. Discouraged already?
A session goes like this:
At dusk, the camera is loaded with film
(if not already) and mounting shoe to attach to the telescope is
mounted to the 1/4-20 threaded tripod socket on the camera body, or
telephoto lens mounting plate.
The telescope is exposed to the sky as
the roof is rolled back at the observatory. Optics are checked,
guiding eyepiece is installed and prepared to receive the camera.
 |
| The Piggyback mounted Pentax 67 with 165 f/2.8 The mount is made by Losmandy |
The camera is mounted atop the
telescope (this is called piggyback mounting) and locked into
position at the proper balance point of the arrangement.
An area of the sky is selected for
exposure. This involves lens selection for framing of a particular
field. Lenses routinely used for this range from 105mm to 400mm
focal length for the Pentax 6x7.
Once the field to photograph is
established and the telescope is locked in place, a suitable guide
star is centered into the double cross-hair eyepiece. This eyepiece
is of the proper magnification to offer guiding corrections less than
10 arc-seconds. The star is centered at the same time the camera
shutter is ready to be opened. Focus on all my Pentax 67 lenses are
set at infinity stop as this seems to be true infinity. Lenses are
stopped down to usually f/4.8 or f/5.6 for fully illuminated fields.
The exposure
begins...................... The guide star is monitored and hand
corrected for accurate guiding during the exposure. This can range
from a short exposure of twenty minutes, to long exposures of an hour
or more. Ninety minutes is the longest I've used in practice. One
hour is typical.
 |
| In the Observatory with setup for a nights session of film based astrophotography! |
Once the exposure is done, the shutter
is closed and next frame advanced if another exposure is to be taken
that night.
During exposure the sky needs to be
scanned visually to make sure aircraft do not enter the photographic
field. Gently capping the lens while the aircraft (or satellite)
passes by, then removed to resume exposure. I've often capped the
lens for five to seven minutes on a one hour exposure during busy
aircraft times.
Wind. A windy night prevents most work
from being done with longer lenses. Wider angle lenses can usually
be employed with such conditions.
Dew. Nighttime moisture tends to build
up on optics and this needs to be prevented or the lenses will fog
up, causing stars to have halos. A small hair dryer works well.
Gently “spray” the lens with the warm stream of air every 10
minutes on moist nights. Heating tapes can be purchased for such use
as well. I use a hair dryer.
Developing films. Color and B&W
films can be processed normally or push processed to bring out faint
details. Only two currently produced films work well for
astrophotography, Fuji Acros and Fuji Provia 100F. Legacy films such
as Ektachrome 200, Superia 100, and Fuji 400F work great!
 |
| The Milky Way of Southern Ophiuchus Fuji Acros 100 Produces fine astrophotographic images. Pentax 67 400mm @ f/5.6 Fifty-Minutes Exposure |
A scanning workflow is best
done at home. With experience, more details and tonality can be
elicited from your films. Post processing in Photoshop and
astrophotographic softwares is of great benefit to film images. Transparencies and negatives contain much more information than you might expect. Film has
the added benefit of having less noise than digital captured
sub-frames, so detail is high given proper exposure and proper guiding
under ideal conditions.
Film based astrophotography has been a rewarding pastime. I've enjoyed the long hours under the starry dome, slowly building up photons on photographic films. If anything, it has been a meditative process. Slowing down and doing it the old fashioned way, it is still a great way to capturing the heavens.
More images at my Flickr site. You can monitor my efforts, both film and digital on my Facebook page. Twitter fans can find me on my Twitter feed.
Film based astrophotography has been a rewarding pastime. I've enjoyed the long hours under the starry dome, slowly building up photons on photographic films. If anything, it has been a meditative process. Slowing down and doing it the old fashioned way, it is still a great way to capturing the heavens.
 |
| Flanders Pond Observatory A shelter and a permanent setup makes it all possible. |
More images at my Flickr site. You can monitor my efforts, both film and digital on my Facebook page. Twitter fans can find me on my Twitter feed.