In the ancient days of film astrophotography, like the 90's, hobbyists and professionals alike used the technique of hypersensitizing film to enable it to record dim images over extended exposure times. During normal exposure times, like 1 second to 1/1000 second, film exhibits a characteristic called reciprocity. If you double the amount of light, you can halve the exposure time. If reciprocity held over all exposure times, then a two hour exposure would show twice as much density on the film as a one-hour exposure. Unfortunately, there are limits to reciprocity that depend on how the film is made. When the exposure is so long that the reciprocity relationship doesn't hold, then you have something called “reciprocity failure”. It is as if the film slows down, and a longer exposure doesn't create a stronger image on the film.
The way I understand it, a grain of silver halide in the film must be hit by two photons of light to be exposed. If photons are hitting the film pretty fast, this happens normally. But if the photons are trickling in one at a time from a distant nebula, you might have one photon strike particular grain, but it sort of leaks away before a second photon strikes the same grain and makes a stable exposed grain. How fast photons tend to leak away is the part that depends on the chemistry of the film. Some films have very little leakage and are good in long exposures, and other films aren't so good. Sometimes manufacturers try to make a film that works up to 30-second exposures, but they generally aren't trying to make a film work over a one-hour exposure.
That's where hypersensitizing comes in. Some researcher decades ago discovered that when you expose certain films to hydrogen for a while, then use them for astrophotography, the reciprocity failure is greatly reduced. It doesn't so much speed up the film, but it makes the normal speed of the film work for much longer than normal exposure times. The hydrogen somehow removes the water and oxygen in the film that usually causes the photons to leak out (technically, it's electrons that leak out after being knocked out of their shells by photons).
Modern(?) hypersensitizing is done with a mixture of 8% hydrogen in nitrogen, a mixture that is sometimes called forming gas. It is safer to use than pure hydrogen, and generally hypers the film more slowly and evenly. In the 90's, a company called Lumicon used to sell a hypersensitizing kit, which included a chamber designed to hold the film, a small tank of forming gas, all the valves and hoses, and a hand vacuum pump, heater, and thermostat. They sold three different sizes for 35mm, 120, and 4x5 film. Lots more people made their own hypering tanks out of metal or PVC pipes or just about anything they could find. Did I mention the vacuum and the heater? Hypersensitizing involves first removing the air from the chamber with a vacuum pump, then refilling the chamber with forming gas. Then you heat up the chamber to 50 degrees C. Hopefully you remembered to put the film in first. The film sits in the forming gas at the high temperature for somewhere between 24 and 72 hours, depending on the film.
Which films do people hyper? That's a very complicated question, whose answer is found by trial and error. In the 90's people hypered Kodak PPF, a color negative film, though I don't know of any color negative films that need it now or aren't destroyed by the process. The classic film to hyper was called Kodak Technical Pan, an ultra-fine-grain black and white film that is sensitive to the whole spectrum, all the way down to and past 656 nm, the wavelength of glowing hydrogen. When Kodak stopped making Tech Pan, most people who were hypering film stopped. Actually by then most people doing any sort of astrophotography switched to CCD cameras. A very small number of people are doing astrophotography with film any more. Transparency films like E200 are destroyed by hypering.
I've never been fond of the idea of having a CCD camera and a computer out there by the telescope when I'm taking astrophotos, so I've stuck with film. A few years ago I got serious with hypering, trying to get a few more pictures out of my remaining stock of Tech Pan. There's a technique called tri-color imaging where you take three photos of an object on black and white film, using red, green, and blue filters. Then you need to align and combine the three, into one color picture. David Malin used this technique in his famous books, and it is similar to what is generally done with CCD cameras to get color pictures.
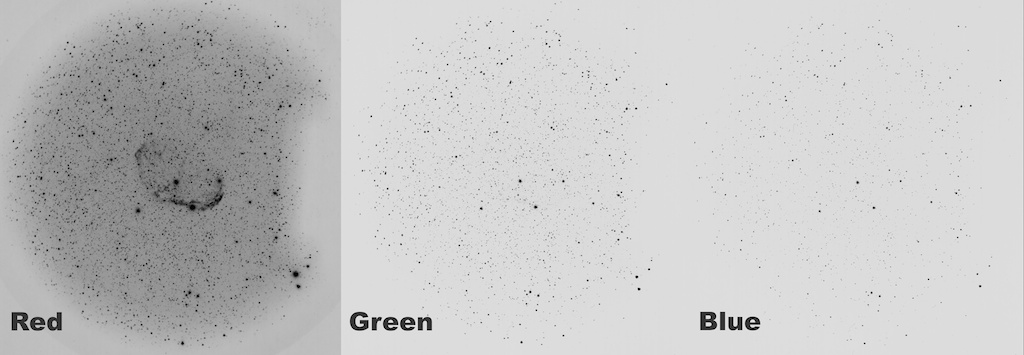
Recently I've been getting worried about the small amount of Tech Pan I have left, and also noticing that Tech Pan isn't as sensitive to blue and green light as it is to red. I read about the success others are having with unhypered Fuji Neopan Acros 100. It is a black and white film, with very fine grain. Very similar to Tech Pan, except it can't record 656 nm red light. I gave it a try recently on a photo I'm working on of the Crescent Nebula, NGC 6888. My idea was to use hypered Tech Pan for the red exposure and unhypered Acros for the blue and green exposures. I always use 4x5 sheet film when I'm taking this kind of picture, so it is easy to mix and match. The Crescent Nebula is an extremely dim object. In general, I can't see it through my telescope. Most pictures I've seen of it are predominantly red, meaning it radiates lots of 656 nm H-alpha light, which we can't see at night, and relatively little OIII. I figured that it would be fine to capture the nebula itself on the red exposure, then use the blue and green exposures just to get the stars. The results of those three exposures are at:
http://www.rickthurmond.com/ngc6888rgbframes.jpg

The red exposure on Tech Pan is great, the nebula is visible and the stars have a full range of densities. The histogram of this picture is quite wide. The other two captured the stars pretty well, which is all I thought I was after, but it takes a lot of stretching to get the star densities to match the red, and even then, a lot of the very dimmest stars picked up by the Tech Pan are not picked up by the Acros. The resulting full-color image didn't look right to me:
http://www.rickthurmond.com/ngc6888rgb.jpg

In the resulting full-color image, the dimmest stars are red. The Acros didn't pick up any skyglow, it also didn't pick up any nebula, except a tiny amount on the green exposure. As you can see, hypering film has a tendency to darken it. That's to be expected, and is taken as a sign that you've done the process correctly. So I was trying to think of a way to get the blue and green exposures to match the red better, when it dawned on me that I could try hypersensitizing the Fuji Acros. As far as I know, it has never been done before, so I put a sheet in the chamber, and gave it 24 hours in the forming gas, half of what I generally give Tech Pan. Then I put that sheet in the camera and took another photo using my green filter, same exposure time as before, and developed the film same as before. The result was amazing, with nice full stars and lots more nebulosity than the unhypered exposure.
http://www.rickthurmond.com/acrosHypered.jpg

I went ahead and hypered another sheet the same way and reshot the blue exposure a few nights later. Now when I scanned and combined the three hypered exposures the results came out more to my liking:
http://www.rickthurmond.com/ngc6888rgb2.jpg

So my plans going forward are to try for some more sorta dim and maybe colorful objects like the Veil nebula and M1, using hypered Tech Pan for the red image, and hypered Acros for the blue and green.
Special thanks to Rick Thurmond for sharing his experiences with hypering and his recent test with Fuji Acros 100 film.
Rick's astrophotographs can be viewed at http://www.rickthurmond.com/astrophotos


